
The 3D Animation utilities are used for creating 3D animations files such as AVI or MPEG. The generated movie files can for example be included in Power Point presentations or web pages. It might also serve as a good tool for inspecting a surface from different angles and with different light settings.
An animation sequence is simply defined by two or more key frames, where the key frame contains all the 3D parameters defining a 3D scene plus a time difference to the next anchor. For each key frame you can define specific position, color, light and wire frame parameters. You can define a given 3D scene as a key frame just by pressing the Capture button. Between the key frame SPIP can automatically calculate key frame, which are 3D images where the viewing parameters are defined by interpolation of the two neighboring key frame. This way you can create a smooth animation that brings you from one key frame to the next by key frame changing in smaller steps.
Below is seen the relation between key frame shown as anchors and frames and how they can be arranged on the time axis.
When having defined one or more key frame you can preview the animations by the preview buttons or export it to AVI or MPEG files, which can then be shown by third party movie players.
The 3D animation pane is activated from right click menu of the 3D image or from the View pull down menu in the SPIP menu bar.

To add a new key frame setup the 3D image as desired and click the Insert Key Frame button: ![]() . When having more key frames the new key frame will be inserted after the selected key frame. It is also possible to overwrite a key frame using the overwrite button:
. When having more key frames the new key frame will be inserted after the selected key frame. It is also possible to overwrite a key frame using the overwrite button: ![]()
For each of the defined key frame the time to next key frame can be set.
The number of key frames per second defines how fast the animation will be shown by movie players and influences the duration and quality of the animation. Few key frame per second will increase the duration but might cause the animation to appear less smooth.
When setting the repeat mode to smooth extra key frame will be calculated for animating the image smoothly from the very last frame to the first.
Hint: If you want your third party movie player to show the animation in a repeatable mode it is a good idea to let the last anchor be identical to the first. This is simply done by selecting the first anchor pressing the Capture Anchor button and choosing End as the anchor position.
You can select the individual frames and key frame by the associated arrow keys and the preview slider. The 3D image will automatically reflect the parameters of the selected frame.
Using the slider or the frame spin buttons it is possible to preview the result of the different key frame that are automatically created in-between the different frames.
After having defined a sequence of frames you can save the anchor parameters so that they can be recalled and applied on other images; to do so click the save button ![]() . Note, that this does only store the visualization parameters and does not create any animation file. To create the animation file see Generating Movie Files below.
. Note, that this does only store the visualization parameters and does not create any animation file. To create the animation file see Generating Movie Files below.
To generate a movie file from a given sequence of frames click the export button ![]() . This will open the menu shown below:
. This will open the menu shown below:
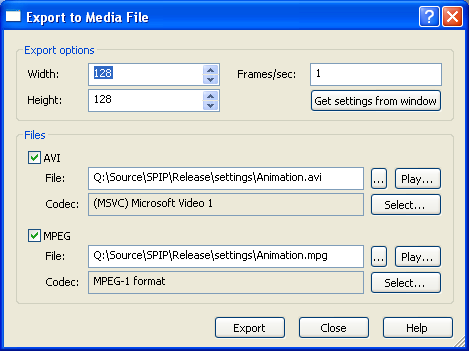
The animation can be exported to the following two movie file formats:
To achieve the highest quality the AVI file format should be selected but if a smaller file size is desirable the MPEG format should be considered. Typically the file size of an MPEG file will be 20 times smaller than the size of the corresponding AVI file. The disadvantage of the MPEG format is reduced quality. You can generate a pair of AVI and MPEG files simultaneously and compare their quality and file size.
The estimated size of the AVI file is shown in the output window and the MPEG file size will typically be 20 times smaller.
If you want your movie to fit a certain frame size this can be set in the top of the dialog.
To create a movie file select the output format and output file name and press the Export button. It is possible to generate an AVI and an MPEG file simultaneously by selecting both formats.
If you have a movie player installed on your computer you can play the generated files by pressing one of the two play buttons.