It is often useful to have structures of an image oriented so that they are parallel to the axes. SPIP provides three ways to rotate and image: 1) by a user defined angle value 2) by an angle defined by the line marker 3) automatically based on a calculation of the unit cell or line structure.
![]() The rotation dialog is activated from the Transformation panel in the Modify tab set group of the Image Ribbon by clicking on the Free Rotate... button
The rotation dialog is activated from the Transformation panel in the Modify tab set group of the Image Ribbon by clicking on the Free Rotate... button
The Align with Unit Cell function requires that a unit cell or line structure has been calculated first. If so, it can automatically perform a rotation as shown below and the optional average profile calculated as well:

Image rotation example: In the upper left image the unit cell has been detected and used for specifying the rotation angle, such that the rotated image shown to the right has the short unit cell vector pointing in the direction of the y-axis. The profile shows the average profile calculated from the rotated image and it is seen that there is a clear periodicity reflecting the lattice structure.
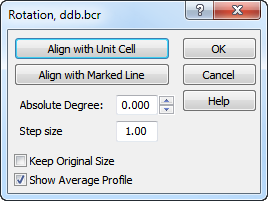
The rotation angle can also be defined by a marked line or by an absolute value.
The absolute rotation angle can be changed interactively by the up-down keys while observing the result simultaneously.
The average profile of the resulting rotation image can be shown automatically by setting the Show Average Profile check box. The averaging is done so that the void areas are excluded from the calculation and provides the best possible estimate of the average profile. See also the above example.
To keep the same amount of pixels in the rotated image, check the Keep Original Size check box. In this case the corners of the rotated image will be excluded. When unchecked the rotated image, will be extended with additional pixels marked as void such that all pixels will be included.