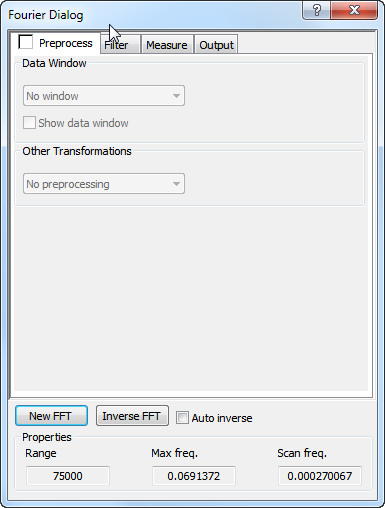
The Fourier Dialog and Fourier Window are closely tied to the Main Image Window, and can therefore only be accessed when the Fourier window is open. It is activated by its associated tool key or from the FFT Image Tools Tab set in the Show panel by clicking on Advanced FFT.

The dialog is organized as a tab menu with four tabs:

Fourier Preprocessing defines the data window and/or other transformation of the input image to be performed before the Fourier transform is performed.
Fourier Filtering can predefine band filters to be performed before inverse filtering and contains strong interactive tools for removing selected Fourier components.
Fourier Measurement is used for detailed detection and measurement of periodicity and lattice structures. It is also possible to determine the associated time domain frequencies in Hz for diagnosis of noise and vibration problems.
Fourier Output defines which output windows to show and how they are scaled.
The lower part of the menu contains controls that can be accessed from all tabs:
The New FFT button is used for recalculation of the Fourier image. You may want to perform a new transformation when another image has been loaded into Main Image Window or the Main Image has been modified by some other procedure; or when you have changed some of the Fourier preprocessing or output options. You can also create a Fourier transform just by clicking the FFT tool key in the main menu without having the Fourier Dialog open.
The used algorithms do not require any specific pixel dimension, except that there shall be an even number of pixels on the x- and y-axes. For uneven number of pixels, SPIP will automatically extend the image by an additional column or row.
SPIP applies fast Fourier algorithms for all image sizes but the best performance is achieved when the number of pixels on the axes is a power of two (radix two). Non-radix two images can be resampled to the nearest larger radix two size by right clicking in the image on "Radix 2 Pixels".
The Inverse FFT button is used for transforming the Fourier image into a spatial image, which is typically performed modification of the spectrum by the filtering tools. The produced image will be shown in its own image window and more images may appear depending on the settings in the Output tab. The inverse Fourier transform can also be performed by right clicking in the Fourier Image on "Inverse FFT". This can be convenient in connection with "Auto Erase Markings" and the "Fourier Dialog" is not active.
The Auto Inverse checkbox can be set to perform an inverse Fourier transform whenever the Fourier image is modified. This can create a fast (almost real-time) visual feedback of the effects of the filter settings and interactive modification of the spectrum. However, the speed depends on the actual image size and your computers general performance and for larger image it might be more convenient to have this option set off.
This option can also be set by right clicking in the Fourier Image window on "Auto Inverse FFT" when the Fourier Dialog is not active.